

 My Little Cakepop® Ball Mold – Round Cake Pop Mold 31 g / 1.1 oz
My Little Cakepop® Ball Mold – Round Cake Pop Mold 31 g / 1.1 ozWant to make perfectly round cake pops with the same shape, size and amount of cake pop dough every time? The original My Little Cakepop® Ball Mold makes it easy…
€ 12,50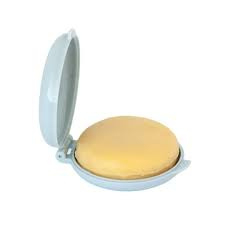 My Little Cakepop® Disc Mold | Flat Round Cake Pop Mold Ø 5 cm
My Little Cakepop® Disc Mold | Flat Round Cake Pop Mold Ø 5 cmCreate beautifully shaped, flat round cake pops with the original My Little Cakepop® Disc Mold. The flat surface gives you plenty of space for fondant, text, edible…
€ 12,50


My Little Cakepop® Molds & Tools
My Little Cakepop® Molds – The Original Cake Pop Molds for Perfect 3D Cake Pops
Want to make 3D cake pops with a consistent shape every time? With original My Little Cakepop® Molds, you can quickly and easily shape cake pop dough into smooth, professional-looking three-dimensional cake pops.
My Little Cakepop® is The Original Cake Pop Mold, designed for much more than classic round cake pops. Create hearts, cupcakes, doughnuts, popsicles, animals and all kinds of seasonal and themed 3D cake pop shapes.
At Partysweets, you'll find an extensive selection of original My Little Cakepop® Molds and matching cake pop tools. We use these molds ourselves for cake pop production, demonstrations and our cake pop workshops in Eindhoven, the Netherlands. That means we don't just sell My Little Cakepop® – we work with the molds ourselves and share our own practical experience to help you get the best results.
What is a My Little Cakepop® Mold?
A My Little Cakepop® Mold is a cake pop mold that uses pressure to shape prepared cake pop dough into a complete 3D cake pop.
Instead of sculpting every cake pop completely by hand, the mold creates the shape for you.
Start by rolling a portion of cake pop dough into a ball and place it inside your chosen mold. Then close the mold firmly.
The pressure pushes the cake pop dough into the complete 3D shape. Excess dough is pushed out between the two halves of the mold and can easily be removed. If necessary, you can smooth the seam by gently rolling a lollipop stick over it.
The result is a neatly shaped 3D cake pop, ready for adding a stick, dipping and decorating.
Why use a cake pop mold?
You can, of course, shape cake pops by hand. This works well for simple designs, but consistency becomes much more important when you're making multiple cake pops in the same shape.
With a cake pop mold, you don't have to sculpt every individual cake pop completely by hand.
This is particularly useful for larger batches, customer orders, party treats, sweet tables, workshops and professional cake pop production.
The combination of the right amount of cake pop dough, the same mold and consistent pressure helps you recreate the same 3D shape again and again.
How do you use a My Little Cakepop® Mold?
Start with smooth, soft and workable cake pop dough.
Divide the dough into portions that suit your chosen mold and roll each portion into a smooth ball.
Place the dough ball inside the cake pop mold and close it firmly. The pressure distributes the cake pop dough throughout the complete shape and pushes excess dough out of the mold.
Open the mold, remove the excess cake pop dough and smooth the seam if necessary.
You can then insert the stick and prepare your cake pop for dipping.
Partysweets tip: making several cake pops with the same mold? Weigh your cake pop dough portions, especially when you're first learning to use the mold. This makes it much easier to achieve consistent size and shape.
How much cake pop dough do you need for a My Little Cakepop® Mold?
This depends on the shape and size of the mold.
A larger or more voluminous mold naturally requires more cake pop dough than a smaller design. Always use the recommended weight for the specific My Little Cakepop® Mold you're working with.
A well-known example is the My Little Cakepop® Round Ball Mold 1.1 oz / 31 g, which we use for our classic round cake pops.
Using approximately the same amount of cake pop dough for every cake pop not only creates more consistent portions, but also helps the mold work as intended.
If you use too little dough, the shape may not fill completely. If you use too much, you'll need to apply unnecessary extra pressure and more excess dough will be pushed out of the mold.
The right amount of dough + the right mold + pressure = much greater control over your final result.
As you gain experience with your favourite molds, you'll often find that you can judge the correct amount of cake pop dough by feel and no longer need to weigh every single portion.
Which My Little Cakepop® Mold should I choose?
That mainly depends on the cake pop design you want to create.
For a classic cake pop, the Round Ball Mold is an extremely versatile choice. If you want a flatter round surface with plenty of space for decorations, text or an edible image, the Disc Mold is a great option.
There are also many My Little Cakepop® 3D Molds where the shape itself becomes part of your design, including hearts, cupcakes, doughnuts, popsicles and themed characters.
The major advantage is that you don't need to sculpt the basic shape yourself every time. The mold creates your starting shape, leaving you free to concentrate on dipping and decorating.
My Little Cakepop® Round Ball Mold
The My Little Cakepop® Round Ball Mold is a staple for cake pop makers.
A perfectly round cake pop may look simple, but creating multiple cake pop balls with exactly the same round shape and size by hand is harder than it looks.
With the Round Ball Mold, you can use the same amount of cake pop dough and press it into the same shape every time.
This makes the Round Ball Mold suitable for almost any theme. A round cake pop can become a simple sprinkle cake pop, but it can also be transformed into animals, faces, Christmas baubles and countless other designs.
Our popular Round Ball Mold 1.1 oz / 31 g is designed for approximately 31 grams of cake pop dough.
My Little Cakepop® Disc Mold
The My Little Cakepop® Disc Mold creates a round cake pop with a smooth, flat surface.
This makes it particularly useful when the front of the cake pop is an important part of your design.
Think fondant decorations, messages, edible images, Edible Journaling™ or our Cakepop Message Stamps.
The flat surface gives you plenty of room for precise decorating and personalisation.
My Little Cakepop® 3D Cake Pop Shapes
In addition to round cake pop molds, My Little Cakepop® offers molds where the shape itself forms an important part of the finished design.
Think hearts, cupcakes, doughnuts, popsicles, animals and other recognisable 3D shapes.
Once the cake pop has been pressed into shape, you don't need to sculpt the basic design completely by hand. You can move on to inserting the stick, dipping and decorating.
This saves time and makes it much easier to create a complete collection of 3D cake pops in the same shape.
Why choose original My Little Cakepop® Molds?
At Partysweets, we deliberately stock original My Little Cakepop® Molds – The Original Cake Pop Mold.
We work with My Little Cakepop® ourselves for cake pop production, demonstrations and workshops. From our own experience, we know how much the right mold, correct amount of cake pop dough and pressure can influence the consistency of your finished cake pops.
When you choose a My Little Cakepop® Mold from Partysweets, you're buying the original branded product together with the benefit of our own hands-on experience.
We don't just help you choose a cake pop mold. We also share practical tips about dough quantities, shaping, inserting sticks, dipping and decorating.
That helps you get the most out of your My Little Cakepop® Molds and create beautifully shaped 3D cake pops again and again.
What's the difference between My Little Cakepop® and Daisy Makes®?
My Little Cakepop® and Daisy Makes® can both help you create consistent cake pop shapes, but the techniques are completely different.
With My Little Cakepop®, you place a portion of cake pop dough inside a mold. By firmly closing the mold, pressure shapes the dough into a fully three-dimensional cake pop.
With Daisy Makes®, you first roll the cake pop dough to an even thickness. You then use a Cutter and Popper to cut the cake pop shape from the rolled dough.
In short:
My Little Cakepop® = press and shape into 3D
Daisy Makes® = roll, cut and pop
At Partysweets, we work with both systems. The best method depends mainly on the type of cake pop you want to create.
What is a My Little Cakepop® Resting Tray?
If you're making round cake pops with a Ball Mold, a My Little Cakepop® Resting Tray is a very useful addition.
When you place a perfectly round dough ball directly onto a flat work surface, the bottom can become slightly flattened.
The Resting Tray holds each cake pop in its own curved section, helping the round shape stay intact while you continue working.
It also keeps the cake pops stable when you're ready to insert the lollipop sticks.
This is particularly useful when making larger batches of round cake pops.
How do you insert the stick into a My Little Cakepop® cake pop?
With our method, we first dip the end of the lollipop stick into a small amount of melted Deco Melts.
We then insert the stick approximately halfway into the shaped cake pop. With shapes such as the Disc Mold, the stick can be inserted slightly further.
Next, we place the cake pop upright in a Cake Pop Stand so the coating around the stick can set before dipping.
This also makes batch production easier: insert a stick, place the cake pop in the stand and move straight on to the next one.
Should My Little Cakepop® cake pops be refrigerated before dipping?
With our method, no.
We don't refrigerate our shaped cake pops before dipping.
A large temperature difference between a cold cake pop and warm coating can contribute to the coating cracking after dipping.
We therefore allow the coating around the stick to set without chilling the cake pops first and then continue with dipping.
How do you dip a shaped cake pop?
Once the stick is secure, you can dip the cake pop into melted Deco Melts.
Try to submerge the complete cake pop in one smooth movement. Allow the excess coating to drain off and then slowly turn the cake pop upright.
Place it in a Cake Pop Stand to set.
If you regularly make larger batches of cake pops, a chocolate melter can help keep your Deco Melts at a consistent working temperature and texture.
How do you get a smooth coating on a 3D cake pop?
A beautifully shaped cake pop deserves a smooth coating.
After dipping, first allow as much excess Deco Melts as possible to drain away naturally.
If a thicker edge or drop remains underneath the cake pop, a Cake Pop Massager can help.
Gently hold the Cake Pop Massager against the lollipop stick. The light vibration helps excess coating flow down more evenly.
This can create a smoother coating, fewer thick edges and a neater finished result.
With more detailed 3D cake pop shapes, it's also important to dip calmly rather than unnecessarily moving the cake pop backwards and forwards through the coating.
How can you decorate My Little Cakepop® cake pops?
Once your cake pops are shaped and dipped, there are almost endless ways to decorate them.
You can use:
- fondant;
- sprinkles;
- drizzles;
- chocolate decorations;
- mini silicone decorating molds;
- edible images;
- Partystamp® fondant stamps;
- Cakepop Message Stamps;
- Edible Journaling™.
Because the My Little Cakepop® Mold has already given you a consistent base shape, you can focus on the creative finishing touches.
One mold can therefore be used to create completely different cake pop designs.
Frequently Asked Questions About My Little Cakepop® Molds
Are My Little Cakepop® Molds the same as silicone cake pop molds?
No.
My Little Cakepop® Molds are designed to shape prepared cake pop dough into a fixed 3D shape using pressure.
You don't pour liquid cake batter into the mold and bake the cake inside it.
Do you bake cake in a My Little Cakepop® Mold?
No.
First, you bake your cake and turn it into cake pop dough. You then use the My Little Cakepop® Mold to shape that prepared dough into your chosen 3D design.
Do I need to weigh my cake pop dough?
We recommend weighing your cake pop dough when you're first learning to use the molds, especially if you want consistent results.
Using the same amount of cake pop dough with the same mold makes it much easier to create cake pops that are consistent in size and shape.
The correct amount varies by mold, so always check the recommended weight for your specific My Little Cakepop® Mold.
Once you've gained some experience, you'll often learn to recognise the right amount of cake pop dough by feel and weighing every portion may no longer be necessary.
Why does cake pop dough come out of the sides of the mold?
This doesn't necessarily mean something has gone wrong.
When you close the mold, pressure distributes the cake pop dough throughout the shape. Excess dough can therefore be pushed out between the two halves.
Simply remove the excess dough before finishing your cake pop.
How do I get rid of the seam on my cake pop?
First, carefully remove the excess cake pop dough.
You can then gently smooth any remaining seam. One of the methods we use is to carefully roll a lollipop stick over the seam.
Which My Little Cakepop® Mold is best for beginners?
Many My Little Cakepop® Molds are very easy to use, so you certainly don't have to start with only a round cake pop.
The Round Ball Mold is a versatile choice because a round cake pop can be decorated for almost any theme. But the Cake Slice, Popsicle, Cupcake and Heart Mold are also very easy to work with when you're using My Little Cakepop® for the first time.
The basic technique is the same: weigh the recommended amount of cake pop dough, roll it into a ball, place it inside the mold and close the mold firmly. The mold does the most important shaping work for you.
So even as a beginner, you can simply choose a shape you love and start experimenting with different 3D cake pop designs.
Can I use My Little Cakepop® Molds professionally?
Yes.
A consistent mold can be particularly useful when making larger batches because you don't need to sculpt every cake pop completely by hand.
We use My Little Cakepop® ourselves for cake pop production, demonstrations and workshops.
Where can I buy original My Little Cakepop® Molds in Europe?
At Partysweets, you'll find an extensive range of original My Little Cakepop® Molds – The Original Cake Pop Mold and matching cake pop tools.
From the classic Round Ball and Disc Mold to distinctive 3D shapes, you'll find our current selection at the top of this page.
We also share our own practical tips and techniques to help you get the best results from your My Little Cakepop® Molds.
Buy My Little Cakepop® Molds in Europe at Partysweets
Ready to start creating your own 3D cake pops with My Little Cakepop® Molds? Browse our current range of original cake pop molds and matching tools at the top of this page.
Combine your mold with good cake pop dough, the correct portion size, lollipop sticks, Deco Melts, a Resting Tray and Cake Pop Stand and you'll have a strong foundation for creating beautiful and consistent 3D cake pops.
Want to learn more about Daisy Makes®, making cakesicles or our Steam Method? Visit our complete How to Make Cake Pops guide, where we explain the different cake pop techniques step by step.
My Little Cakepop® – The Original Cake Pop Mold. Discover the original range at Partysweets and create beautifully shaped 3D cake pops at home or professionally.